Monday, September 30, 2013

September in Review


How is tomorrow October 1? There are only 3 months until we hit 2014. Oh my.

Is it just me, or did September fly by?

Ok, so maybe I think every month flies by. But it's only because I'm having fun, right?

Looking back, here are our favorite posts of September.
Lots of Fall fun this month!


Favorite Recipe

Hello, Fall!


Favorite Tip
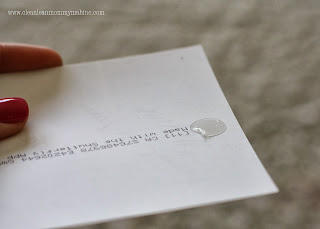
No more scraping and breaking nails over stubborn stickers!


Favorite Organizing Post
Keep up with kids' clothes, save time and money. Check, check, check.


Favorite Activity Post
Fall Bucket Lists
 Jess and I shared what we want to do with our families to enjoy Fall!


Favorite Friday Favorite
We love these handy lunch boxes that keep lunch organized and easy.

We hope you've had a great September too. We are excited for October and the fun things we have to share with you all!

Friday, September 27, 2013

Frame Makeover & Interchangeable Photo Collage


I confess to being a mammarazzi and taking lots and lots of pictures of my kids. The problem is that they sit on my phone or computer. I make a yearly family photo book, so that helps, but there are still lots and lots that never get printed.

I have two frames in my dining area that have had the same poster prints in them for 6 and a half years. I think it's time for a change! I also recently downloaded the Shutterfly app (not a sponsored post) where you can easily print 4x4 photos from your phone- these can be pictures from your iphone or your Shutterfly albums.

Frame makeover meets new photo app for a fun project!

Frames before
Here's what I bought:
Burlap
Spray adhesive
Glue dots
24 4x4 pictures
I already had the two 16x20 frames

Using Spray adhesive, I glued the burlap to the back of the frame (the part that it usually hidden by the picture). Then, I reassembled the frame.


Using glue dots, I stuck the pictures in a grid pattern. I didn't even measure so some pics might not be exactly in line, but I haven't seen any big mistakes yet ;) I tried using double sided tape to hang the pics, but glue dots stay much better because they adhere to the texture of the burlap better.


I didn't put the glass back in the frame, but you could if you want.  I also didn't use permanent adhesive (like hot glue) because I want to change the pictures out often. My plan is to order a few pics at the beginning of every month so that we always have new pictures to look at.
 
Frames after

These frames hang in our eating area so it makes for fun dinner conversation to talk about the fun things we are doing in the pictures. All in all, this quick and easy project makes my mammarazzi heart happy!

Wednesday, September 25, 2013

Kid's Art Book


*this is a super old blog post from my photography blog that I no longer update. all photographs are mine- they just have my photography watermark on them instead of CLMM

I'm pretty good about getting rid of things that are cluttering my house. Emphasis on pretty good. I have papers scattered about in my office that need to be filed, shredded, or simply just thrown out. Amongst the papers are piles and piles of art projects my kids have brought home from school. I have this overwhelming sense of guilt every time I even think about throwing those projects in the trash. My kids worked so hard and are so proud of the things they create. I can relate. I feel the same about my photography and would never "throw out" any of my projects. Every final image gets saved, backed up, and archived. 

Last year, after the art project pile got out of control, I decided I would photograph each piece of art and assemble it into a picture book. Genius, right? I was able to archive every piece of art from 2011 and have a fun keepsake for the kids to look back at years from now. 2012 was no different. I have even more art to photograph because both kids are now in preschool! I'm working on photographing the large pile of art- hopefully I'll have the 2012 book complete soon... I've been a slacker. 

Want to archive your kids art into a fun keepsake? It's so simple- 

1. Designate a place in your house for all of your kids art work and collect it there. I do this by calendar year- not by school year. You can choose to do it either way. 

2. Photograph each piece. The smart way to do this would be to photograph it as it comes home. I'm not so smart and photograph it at the end of the year. I know, I know. The pile takes over my office. 


3. Upload your images to your computer. 

4. Choose a company to design and print your book. I've used Shutterfly and Mpix in the past. Both are great. Shutterfly often offers free photo books and you just pay shipping! 

5. Once you receive your book, throw out the art work and start new. I usually save a couple of my favorites, though. :) 


My kids LOVE looking through their art book. I know that years down the road I will be happy that I archived their art this way. Plus, I'll be able to show it to their families someday, too! 

Tuesday, September 24, 2013

Tip for Tuesday: Lighter Fluid Sticker Remover

You know when a sticker gets stuck and won't come off? Or when you are peeling the barcode sticker off of a new glass and there is residue you just can't get off?

There are lots of products designed to remove stuff like this- but why spend money on those things when you've probably got something already on hand?

Lighter fluid!

KC is the one who showed me this trick. I had a pair of new sunglasses and I couldn't get all of the sticky residue off of the ear piece where the manufacturer's sticker had been.

Put a little lighter fluid on a paper towel and rub gently until the sticker is off. I don't recommend doing this on porous surfaces such as fabric, but on hard surfaces like glass, plastic, and sealed wood, it works great!


Monday, September 23, 2013

The Perfect Bran Muffins

Don't you just love fresh muffins? Nice and warm out of the oven- that's the best.

This recipe has been in my family for a while. It's my aunt's recipe and I'm so grateful she shared it. Bran muffins are so delicious, such a great flavor. These muffins are nice and moist and fluffy. You can mix them up many different ways and the best part is- the batter keeps in the fridge for up to 6 weeks. 6 WEEKS! That means you can wake up and just make a couple of muffins every morning.

You can always have warm, fresh muffins!


Aunt Trish's Bran Muffins

Preheat over to 400 degrees.

In a separate bowl, mix 3 cups All Bran cereal and 1/2 cup hot water. Let sit while you prep other ingredients.


In a mixing bowl, combine the following:
2 eggs
3/4 cup canola oil
2 1/2 cup flour
1/2 cup sugar
2 1/2 teaspoon baking soda

Once combined, add 2 cups buttermilk and bran mixture and mix well.

Fill greased muffin tins 3/4 full and bake for 20 minutes. *Remember to add water to any muffin cups that aren't filled.

Batter can be covered and kept in the refrigerator for up to 6 weeks.


Variations 
Separate a portion of the batter and mix your choice of the following:
Chocolate chips
Raisins (soak the raisins first)
Blueberries

Topping
Cut together 1 Tablespoon of cold butter, 2 Tablespoons of flour, and 2 Tablespoons brown sugar. Sprinkle on top of muffins.

Spreads
These muffins are great plain with a little butter but they are also great with jelly, peanut butter, nutella, or any other spread!

These muffins are a great, healthy option. Making a couple of muffins at a time lets you change up breakfast!

See more recipes to help you bake outside the box here.

Friday, September 20, 2013

Why I Bought a Treadmill


So, we bought a treadmill.

I realize this seems silly for me to be blogging about this purchase, this isn't a sponsored post.

Part of living healthy is making sure you are active. I am certainly active with my kids, but I know that I need to go above and beyond day-to-day activity to keep in shape and continue to push myself to stay healthy.

We have been talking this purchase over for a while now. I have gotten into my "clean & lean" routine and I have told you all how it has helped me. But I have reached a plateau point- that point in any lifestyle change where your body gets used to a certain activity level and calorie intake and settles into a certain weight. In order to move on to the next plateau (and drop more weight), you have to make additional change.


My change, beginning this summer, has been to walk/run in addition to my "clean & lean" schedule. The problem was that I live in Oklahoma where the summers are super hot and humid (excuse). It is also difficult to find a good time to get in a 30 minute walk/run (excuse). I wasn't able to keep up a consistent schedule and it was frustrating. So we started looking at treadmills.


Talk about an agonizing decision. There was a "pro/con" list for this for sure. Here's what swayed us:
  • We can get our cardio while the kids are napping or playing.
  • We don't have to worry about the weather being an excuse.
  • We both needed something to constantly motivate us- nothing says motivation like a couple hundred bucks sitting in your bedroom.
We have had the treadmill for about a month now and I have already noticed a difference in my energy level! Using it consistently- 30 minutes 3-4 times a week- has helped tremendously. I don't weigh myself, but I can say that my pants are fitting loser and my goal is to be down at least one size by my birthday (in Feb).


I am excited about being able to change up my workouts and continue to improve my fitness routine. I doubt this will be the last blog about my treadmill. :-) This is one step in a healthier direction for me!

What is something you've done this summer to be healthier? I'd love to hear it!

Wednesday, September 18, 2013

Healthilicious Pumpkin Chocolate Chip Bars

This past weekend was perfect. There was a chill in the air, I wore my new TOMS, I had a breakfast date with my mamma- followed by a coffee date. I had a lunch date and an afternoon full of shopping with my sister- we found her the perfect outfit to wear for her baby shower this coming weekend! I may or may not have had more coffee. I also cooked up a batch of chili on Sunday; the weekend just screamed FALL... and I love everything about fall- it's my absolute favorite.

Here is me and my sister enjoying our afternoon Starbucks. I had my favorite- Caramel Macchiato.


With the fall season comes recipes with everything cinnamon, apple, and pumpkin, and if you're on Pinterest, you have seen your fair share of it already!

One of my favorite sweet treats to make during this time of year are my Pumpkin Chocolate Chip Bars. They make my kitchen smell like a Venti Pumpkin Spice Latte- who wouldn't love that?


These bars are super moist and melt in your mouth; I suggest sharing these with family, co-workers, or neighbors or these may just disappear in less than 24 hours.

I made these "healthilicious" by using white whole wheat flour, substituting some of the granulated sugar for honey, and using dark chocolate. The spices I chose to use in my version of these bars are my fall favs- you could easily add a pinch of ginger and/or clove.


Enough chatter- let's get to the recipe!


Healthilicious Pumpkin Chocolate Chip Bars
adapted from Bake at 350

Ingredients
2 C. white whole wheat flour
1 1/2 tsp. cinnamon
1/2 tsp. nutmeg
1/8 tsp. allspice
1 tsp. baking soda
3/4 tsp. sea salt
1 C. unsalted butter (room temperature)
1/2 C. pure organic honey
1/2 C. granulated sugar
1 egg, room temperature
2 tsp. vanilla
1 C. pumpkin puree
1 12 oz. bag of dark chocolate chips or chunks

Directions

Preheat oven to 350 degrees. Line a 9x13 pan with tin foil (if you don't have foil on hand, just grease your pan).

Whisk together your flour, spices, baking soda, and salt in a medium bowl. Set aside.

With a stand mixer (a hand mixer would work, too!) , cream together butter and sugar until well combined and smooth. Add honey, egg, and vanilla and mix until combined. Beat in pumpkin puree. It might look a little curdled- don't freak out. This is totally normal!

Add your dry ingredients to your wet ingredients. Mix only until combined- it's important not to over mix the batter. Stir in your dark chocolate.

Spread your batter into your 9x13 pan lined with foil. I used the back of a spoon to spread it and even the batter out.

Bake approximately 30 minutes or until toothpick comes out clean.

Let the bars cool completely in your pan and cut into squares.


Enjoy... and try not to eat the entire pan. I dare ya!


Tuesday, September 17, 2013

Tip for Tuesday: The Secret to Perfectly Seasoned Meat

Today's tip comes from none other than my hubs, A. I'm not gonna lie, this tip is pretty ingenius and I'm a bit jealous that I didn't come up with it myself. He's also really excited that his "system" is blog worthy and has been bugging me for over a month about when I'm finally going to share it with all of you. Oh, the life of a blogger's husband!

So, one evening we were getting ready to throw some chicken on the grill, and I asked A to season the chicken. He started to do the most bizarre thing (well, that's what I thought at the time)- he was pouring all of the seasoning onto a plate... not on the chicken. I just kind of watched him for a minute because I was totally confused, but realized that he was basically a genius.

Here's the (his) secret to perfectly seasoned meat:


Grab a plate and all of your seasonings.
Shake out your seasoning onto a plate. Just enough for one side of your meat (or veggies too, I suppose!).
Lay your meat on the plate and press down on it a few times to be sure the seasoning sticks.
Season the side facing you...
... and that's it.

Simple, but very effective. I used to get so annoyed when seasoning things because when I'd flip it over, half the seasoning would come off. That doesn't happen with this little trick from A.

What is one of your favorite tips? Share with us and we may feature it on a future Tip for Tuesday!


Monday, September 16, 2013

Kids Fall Wardrobe Checklist


It's that time again! Clothes shopping time that is.

Fall is just around the corner and in order to make sure that all of my kids' fall clothes are in on time- I'm online shopping this weekend.  I start to keep a look out for good sales around Labor Day, but a lot of times if you wait a couple more weekends everyone starts sending coupons because the back to school rush is over and there isn't another holiday sale opportunity until Black Friday.

This is also a good time to go through the kids clothes from last year. Usually, my kids have very few things that fit from the previous year. I am used to having to buy all new clothes because my kids grow like weeds.

I typically shop for my kids at Old Navy (not a sponsored post or comment) because they have cute clothes that are priced nicely and they email coupons all the time. I have a Gap card so I use the rewards points to buy a few Fall pieces for myself too :-)

I use the checklists below to see what we have that still fits from last year and I only buy what we need for this year. I also used Polyvore this time to make sure that the outfits matched, you can see my kids' outfit boards here and here. I had never done this before but I will be using this all the time now!

You can see my Spring Checklist and more of the reasoning behind my shopping method here.

There are a few differences when it comes to Spring vs Fall clothes (besides the obvious)- because I live in Oklahoma, our winter clothes and fall clothes are the same. We just add a heavy coat, hat and scarf for winter. Also, because this season involves school (not summer time), I buy a couple extra play clothes so that we have a change of clothes in backpacks at all times.


Friday, September 13, 2013

Friday Favorite: Laptop Lunches Bento-Ware


*This post is not sponsored by Laptop Lunches. I just really love their lunch box!


I'm so excited to share with you one of my favorite things regarding school lunches- the Laptop Lunch Box! I ordered this last year hoping it would last through little dude's preschool years... and maybe even beyond. I'm pretty sure it will last us a few more years- it's sturdy and easy to clean, which keeps it in great condition!


I love this expandable pocket on the side. 
It's perfect for a thermos, juice box, or other beverage container.

The handle is easy for little hands to grasp. 

The "Bento Boxes" that go inside are awesome! They have a ton of different size and color options. They're dishwasher safe, too, which is always a plus in my book. 

You can configure them is so many different ways too- I love options! 

On the right-hand side there's a space for silverware and a napkin. 
It's handy and the perfect size. 

The front zipper compartment is great, too. 
I use it to send along snacks, since Little Dude gets a morning snack at school. 
It can also be used to hold lunch money or anything that doesn't fit inside the box. 
Oh, and act like that dirty spot doesn't exist. Oops.! 

The lunch box is a little pricier than those you can find at Target or Walmart, but I guarantee you'll get more time out of this one and it's worth the investment! 

Do you have a favorite lunch box? We'd love to hear about it! 

Wednesday, September 11, 2013

Healthilicious Lunch Box Ideas

My kiddos have been in school for a week now, and although I only have to pack lunch for one of them, I'm already stressing out about making sure he gets a good variety of foods in his lunch box every day.

Luckily, there have been lunch box posts all over Pinterest this past month which has given me some inspiration... but because of my love for lists, a list of lunch options works best for me. If you're a lover of lists and stuck in a lunch box rut, this post is for you!


I try to choose a food from 3-4 of these categories every day. I usually do a PB & J once a week, but like to mix it up on the other days. Try hummus w/ whole wheat crackers in place of a sandwich or send a greek yogurt along to double as dairy and protein! Sometimes I even send "breakfast" for lunch- whole wheat waffle strips, greek yogurt, and a fruit is a quick lunch to put together and it's nutritious!

Have a picky eater? See how Lynns packs for her kiddos!

What are your favorite healthy lunch box fillers?

Tuesday, September 10, 2013

Tip for Tuesday: Take Lunch for a Whole Week

Yesterday, I mentioned that I am not  "pre-packer" when it comes to lunches. This goes for my lunch too. I only work part-time, so I don't get a long lunch. I found myself running to a fast food place a lot even though I was trying to pack a lunch everyday. Most days I either forgot or just didn't have the time in the morning. Obviously, I needed to do something different.

I started adding things to my grocery list that I could bring to work so I had my lunch for a whole week. There is a common fridge down the hall from my office so I can keep things cold. Here's what I typically bring:

Variations:
Fruit (strawberries, grapes, apples)
Peanut Butter
Pita Chips
Pretzels

I take the whole box, the whole carton and a whole bag of carrots (prepped) so that I can portion them out when I'm hungry- not when I'm racing out the door.

Monday, September 9, 2013

What I Pack My Kids For Lunch

My Little Man is a picky eater. Super picky. He gets it from me so I can't complain. Little Miss is a pretty good eater, she likes most things that I give her. She gets that from her dad, thank goodness.

I usually make all of our meals myself so I can accommodate my kids' likes and dislikes. I'm not a short-order cook, but I try to make sure my kids get balance and variety in their meals.

Lunch is the only meal we don't eat together. Little Man takes his lunch to school and Little Miss takes hers to Mother's Day Out.

My main goal with their lunches is to pack things they will eat- hungry kids don't pay attention well in school. Secondarily, I try to have at least 3 out of the 5 food groups packed for them. This is harder than you think because of my son's picky-ness and because I can't send nuts in my daughter's lunch.

Here's what our typical lunches look like:
For my picky eater
I always have a "snack" item just in case he doesn't feel like eating his sandwich, or in case he's extra hungry!
I mix up the applesauce with strawberries or grapes at least once a week.
The bread for the PB&J is homemade. Here's the recipe link.
Counting the peanut butter, he's got 3 food groups.

No Nuts
Little Miss is 2 so she doesn't need as much to eat, but still needs the variety.
I break up the turkey and cheese so it is better finger food for her. I will mix up the lunch meat and occasionally use ham. If we had chicken the night before, I will switch turkey for a few bites of the leftovers.
I love the GoGo Squeeze applesauces. Here's how Jess makes her own applesauce pouches (super easy!). I will also trade out the applesauce for strawberries or grapes if I have some in the fridge.
The goldfish and rasins are in case she is still hungry. The goldfish are her "grain" to help fill her up and keep her full until snack time.
4 food groups here!

When it comes to prepping lunches, I wish I could say that I was super prepared and make the kids lunches the night before. But I don't. Everything here is quick. That's important for me in the morning.

I also wish I could say that I have so many cute, fun lunches pinned so that I can make super cute things every week. But I can't. I send my kids with foods that I know they will eat. I have a few variations so they won't get bored, but filling up their tummies with semi-healthy food is my main goal.

Packing lunches may be a chore, but I feel better knowing my kids are happy and well fed.

Do you pack your kiddos lunch? Tell us their favorite lunch item!

Friday, September 6, 2013

Fun Fall Bucket List: Minnesota Style

Oh, how I love fall. I seriously just love it. Boots, scarves, apple and pumpkin everything, the colors, sitting on my front porch sipping coffee on chilly mornings... who couldn't love fall?

Here in Minnesota the season is beautiful and abundant with vibrant colors, but we're never sure how long it will last. I don't like to let a weekend of this season go by without taking advantage of all the fun things it has to offer. It's not uncommon to see some snow fly in October, so I embrace it for all it's worth!

Earlier in the week, Lynnsey shared her family's fall bucket list, and today I'm going to share mine. I'll also link you to some of my favorite spots in Minnesota, in case you're ever in the area and want to check 'em out.


Jim's Apple Barn: If you are a Minnesotan and never visited Jim's... but this on your bucket list- now! Pumpkins, apples, fresh apple pies, nostalgic candy, unique root beers, and puzzles are just a few things you'll find at Jim's in Jordan, MN. It's definitely an eclectic mix of things, but it's one of my absolute favorite places to go every fall! Every time I go, I choose a different root beer- some day I'll have tried them all. Dream big, right? :)

Center Creek Orchard: I've never been, but know friends who have nothing but great things to say about this place. They hold a Fall Festival every weekend in September and October and hold other special events throughout the season. They also have a pumpkin patch and apple orchard.

A Maze'n Farmyard: This isn't on my list because we did this over Labor Day weekend, but wanted to share! It's located in Eden Valley, MN and is a super fun day trip for the kiddos. They have lots of farm animals that you can feed and touch, pony rides, a bounce barn that has 5 bounce houses (which my kids loved), and lots more. It's fun and reasonably priced!

What's your favorite thing to do in fall?

Wednesday, September 4, 2013

Healthilicious Apple Pizza Bar


School started for my kiddos yesterday and I couldn't be more thrilled! I'm pretty sure they were both excited to get back into a routine, see their friends, and do what they do best at preschool- play! I'm excited because I get a little peace and quiet during the day, I can be a bit more productive, and let's face it- reclaim my sanity! :)

One thing I love to do for the kids during the school year is whip up fun after-school snacks. Don't get me wrong- I don't put this much effort into their snacks every day, but about once a week I surprise them with something fun and different.


Yesterday, I made up this apple pizza bar. So fun, right? Plus, apples are in season now and I get a little obsessed with them this time of year. My absolute favorite apple is Honeycrisp... you just can't beat it. Except for this one time, when I had a Moscato apple. Yes, Moscato- it was amazing, but I haven't seen them in a couple years now. Boo-hoo. Guess I'll just have to have a glass with my Honeycrisp apple instead!


Anyway, the possibilities are endless with this apple pizza bar. You could set this out at your fall or Halloween party, during Football game get togethers, or even at your kiddo's birthday party.

It's simple to put together- just gather up some yummy apples, core them, and slice them horizontally. Grab some toppings (don't worry- I'm sharing our ideas!), silverware, napkins, and plates to set out at the table and you're good to go.

Mom's pick:
peanut butter/ mini chocolate chips/almonds/cinnamon


You'll want to have a base to spread on your apples so the toppings stick. We picked greek yogurt (surprised? I didn't think so.) and peanut butter.

You could also try:
Honey
Fruit spread
Almond butter (or any other nut butter)
Nutella
Whipped greek yogurt cream
Cream cheese sweetened w/ pure maple syrup


Here are a few of our topping ideas: 

Raspberries
Blueberries
Strawberries
Raisins
Craisins
Chocolate chips (all varieties- milk, semi-sweet, dark, and white)
Sprinkles
Cinnamon
Unsweetened coconut flakes (try toasting them- yum!)
Cereal crumbles (our Envirokids Gorilla Munch worked perfect!)
Granola
Almonds
Peanuts
Walnuts
Caramel
Homemade Berry Sauce
Homemade Chocolate syrup (this is our favorite recipe!)

You could also add in candy (great way to use up that extra Halloween candy!) or other sweets to the mix if you want to make this more of an indulgent or dessert apple bar.

KK's pick: greek berry yogurt/raspberries/kix cereal


Food is so much more fun when it's interactive, isn't it? I think so!

LinkWithin

Related Posts Plugin for WordPress, Blogger...