Friday, June 28, 2013

Friday Favorite: My BFF Jess


So, I know you guys know a little about Jess. But did you know she is about to have a birthday?!

Yes, that's right, my BFF is having a birthday this weekend and I wanted to share with you all a few of the reasons why I am so glad she was born.

A list of 10 things I love about Jess:

1. She laughs at A LOT of the same things I do. There aren't many people who laugh- and I mean really laugh- at randomness, so to find someone who appreciates the same things as I do is wonderful. Our 3rd BFF, Lauren, completes our trio. We are all each others lobsters.

51. She introduced me to Tom's. #lifechanger

10. She is one of the most driven people I know. Her ambition is inspiring. Many of the healthy things I have shared with you all here are inspired by her. Many of the "mom" things I share are inspired by her. She is an inspiring person. No lie.

67. She surprised me after Little Miss was born by coming to visit. I'm not sure how she and Lauren pulled it off, but no one has ever done anything that special for me!

42a. Her nick name in college was "Miss Health Promotion". If there was a crown given out for our degree she would have won it. She is passionate about health, y'all. But she's not someone who makes you feel unhealthy, it's awesome, she can share healthy messages and it makes you think you can do that too.  {aaaaand that's why we have a blog}

42b. I probably would have had bad grades in college if she hadn't made inspired Lauren and I to study. She also found me my internship... so I probably owe her some of the credit for my degree. Thanks for that Jess!

23. She loves S'mores. She even pins S'more recipes to share with me. How sweet is that?

73. We make a long distance friendship work. That's talent, people.

138. She can quote Friends as well as I can. This is a big reason why we are friends. For example, she pinned this and it made me laugh out loud:

30. She has been my friend through thick and thin, ups and downs, and through it all we have grown, matured, started families, and I have learned the meaning of friendship. I'm so grateful to call her a friend. A best friend. 

 H A P P Y     B I R T H D A Y     J E S S!

Wednesday, June 26, 2013

Healthilicious: 5 Fab Smoothies for Summer (or Anytime!)

I mentioned last week that ever since I quit my morning coffee ritual, that I've been making smoothies. The funny thing is that when it comes to coffee, I basically stick to one way and one way only. Smoothies, on the other hand, are another story. I need change and no two days can ever be the same... at least in the same week.

So, today I'm sharing my 5 favorite smoothie combos (no measurements because I never measure. ever.) and since I'm kind of obsessed with nutrition, don't be surprised if you get a little education on the side. ;)


1. Strawberries, mango, pineapple, almond milk (unsweetened), a spoonful of plain greek yogurt, a small handful of ice.

2. Strawberries, pineapple, simply lemonade, handful of ice

3. Strawberries, blueberries, raspberries, blackberries, 1/2 banana, handful of fresh spinach leaves, almond milk (unsweetened), spoonful of greek yogurt, small handful of ice.

4. Mango, Pineapple, 1/2 banana, almond milk (unsweetened), spoonful of plain greek yogurt

5. Strawberries, peaches, 1/2 banana, almond milk, 2 spoonfuls of plain greek yogurt, small handful of ice


As you can probably tell, I use almond milk and greek yogurt in most of my smoothie recipes. Both of these ingredients rock and really pack a punch when it comes to nutrition.

Almond Milk: High in Vitamin E (an antioxidant important for your skin), low calories (mine has 60 calories per cup), and low in carbohydrates- so it won't spike your blood sugar. The amount of sugar found in almond milk is known as "low glycemic", so your body will fully digest it and use it as energy instead of storing it as fat. Sweet, huh? (of course, making your own is better than store-bought, but I haven't tried it!)

Plain Greek Yogurt: High in protein- mine has 23g protein in an 8 oz. serving, so even using a large spoonful in your smoothie will give you a good source of protein!  Low-carb (again, won't spike your blood sugar), and packed with live and active cultures for good digestive health. My favorite is Chobani Plain Non-Fat- all natural ingredients and no added thickeners. Be aware that all greek yogurt is not created equal- check the label to be sure thickeners, like corn starch, are not being used.

I also use strawberries in basically all of my combinations- I just love them! They are in season now, so I'm stocking up and freezing them to use later. Not to mention, they are loaded with Vitamin C (immunity boost, anyone?), packed with antioxidants and phytochemicals which fight against inflammation and protect your heart, and are a great source of folate (essential in the early stages of pregnancy).

My mommy machine secret for making a quick smoothie is to cut and freeze fruit ahead of time, and  I usually do this in conjunction with my weekly snack prep. You can also make a big batch of smoothies and freeze them. Just thaw out in the refrigerator overnight- easy peasy!


Tuesday, June 25, 2013

Tip for Tuesday: Trash Bowl

This may seem too simple. But it is amazing what a difference this tip makes!

Rachel Ray is the person who had this tip and as soon as I saw it I knew it would be a great thing for me to try!

I always use a trash bowl. It saves time:

  • Before I even start cooking- in the morning, I placing the meat or chicken I will need for dinner in the bowl and then cover it with water, this speeds up the thawing time
  • While cooking so I don't have to go back and forth from my prep "station" to the trash can
  • Cleaning up because I don't have trash all over my counters
Any bowl can be a trash bowl. Any trash can go in the bowl. I use it for food scraps, wrappers, paper towels from washing my hands, you name it.

When you are cleaning up after dinner you can sort the trash into recycling containers and dump the rest right in the trash can! I highly recommend you try this little gem of a tip.


Thanks Rachel ;)

she's got no clue who I am

What's your favorite time saving tip for the kitchen? Share it with us!

Monday, June 24, 2013

Bake Outside the Box: Breakfast Favorites

Breakfast food is my favorite food to make. Oddly enough, I prefer to have breakfast for dinner rather than in the morning. I think this has something to do with me not being a morning person- I need to wake up to enjoy my food.

Anyway, in an effort to feed my family healthy, breakfast foods are things I bake on a regular basis. I try to make one breakfast item per week (usually on Sunday) and then freeze extras so we can eat them throughout the week. If we have to eat cereal or pop-tarts one or two days- I'm ok with that. We are shooting for the majority of our breakfasts to be homemade and we are able to do that most of the time.

Jess mentioned that she plans her breakfast item weekly. I usually just see what sounds good on Sunday morning :) However you make baking from scratch work for you- go with it!

I have posted my tip for freezing pancakes, this little Mommy Machine Secret works for all of these recipes!

One thing I love about these recipes is that they allow for variety. If I have blueberries- I throw some in. Bananas go great with the oatmeal pancakes. I've even been known to put a few chocolate chips in between 2 pancakes when I heat them up in the microwave in the morning. You can change little things to make all of these recipes work for you!

The last tip I have for baking breakfast outside the box is to add whole wheat flour. You can usually substitute 25% of the all-purpose flour for whole wheat and not notice much difference in taste and texture. The fiber that this easy switch adds is totally worth it!


Here are the links to my favorite breakfast recipes, I have also created a Pinterest board called Baking Outside the Box where I have added all of the recipes I share in this series!

Pancakes *can easily be doubled and extras frozen
Oatmeal Pancakes
Waffles *can easily be doubled and extras frozen
Blueberry Muffins
Biscuits (these are great with strawberry preserves!)
Coffee Cake *cut into squares after cooling completely and freeze unused portions for later
Banana Bread

I hope you enjoy these recipes. What is your favorite thing to bake for breakfast?

The first post in the BOTB series can be found here.

Friday, June 21, 2013

Friday Favorite: DIY Outdoor Storage

Isn't it amazing what spray paint can do?

I did this project a couple of years ago and these buckets still look great! Back then Little Man was starting to accumulate outdoor toys and we had zero storage. I needed outdoor storage for things like trucks, balls, shovels, etc.

I picked up a couple of galvanized buckets at Lowe's and some spray paint.

I used painters tape to tape off stripes on the red one. I decided to leave the blue one solid, but stripes would have been cute there too.


After taping off the stripes, I spray painted both buckets different colors. Once the paint was COMPLETELY dry, I took the tape off and, voila! Super simple, cute storage.


The kids can carry these buckets with them all around the yard. They make play time and clean up easy peasy. That's why they are a Friday Favorite.

Wednesday, June 19, 2013

Healthilicious: Frozen Peanut Butter Banana Sammies

Once the summer heat settles in here in Minnesota, I'm always thinking of and searching for healthy snacks for the kids that will cool them off after an afternoon walk or time at the playground.

Last summer I started making these frozen peanut butter banana sammies, and they were a huge hit with my kids. I was even able to make them gluten-free for Speedy with "S'moreables"- a great gluten-free alternative to graham crackers!

I should warn you that these are ridiculously simple. Like, even my husband could do this... and that's saying a lot. ;) Three ingredients, 10 minutes of prep, about an hour or so in the freezer, and you have a super yummy treat! I usually make them in bulk when I prep our weekly snacks- such a time saver!


Frozen Peanut Butter Banana Sammies

10 graham cracker "sheets" (s'moreables, if you're gluten-free)
2 bananas, mashed
natural peanut butter (we love Jif brand)

1. Break each graham cracker sheet in half, set aside.
2. Peel bananas, and mash with a fork.
3. Spread peanut butter on the underside of each graham square.
4. Spread banana mash on top of peanut butter (just one square) and top with the other square.
5. Put them on a baking sheet or plate and stick them in the refrigerator for 20 minutes or so. Take them out and wrap in foil. Store in freezer for up to 1 week.

Your kids will love them, and you probably will, too...so make extra.

Tuesday, June 18, 2013

Tip for Tuesday: How to Freeze Fruit for Smoothies

Ever since I broke my daily coffee habit (oh, how I miss it so!), I've been drinking smoothies. While they are super yummy, they're kind of a pain in my you-know-what to make. Who wants to cut up fresh fruit every single day? Ok, I guess not everyone makes smoothies on a daily basis, but I do! ;)

It's super easy to cut up a bunch of fruit to freeze- you could even do this in conjunction with your weekly snack prep. Two birds, one stone!


There is a method to freezing fruit, though. To be sure it doesn't all clump together in the freezer bag, lay the cut up fruit on a parchment lined baking sheet. Stick the sheet in the freezer for 30 minutes or so and THEN put the fruit into a freezer bag.


Super simple, right? Now get to it!


Monday, June 17, 2013

Bake Outside the Box

One of the 6,832+ reasons that Jess and I are friends is that we both share a passion for health.  It's the reason we met, when you think about it.

Even though I knew about nutritional issues and healthy food from college, when I had Little Man, all of a sudden I was acutely aware of what I was eating and what I was feeding my family.  Jess' Cut the Junk Series is an amazing illustration of how you can feed your family healthy meals that are easy and so good for you.

I am a big believer in "family meal time" and I enjoy cooking for my family. I love knowing exactly what is going into our meals and having some control over how much sodium and fat we are eating.

As much as I enjoy cooking, I LOVE baking. I mean L-O-V-E! I have shared several healthilicious recipes with you all but, even if I'm not trying to make healthy substitutions, I still enjoy baking from scratch.

I used to just make cookies. They are easy and anytime I would buy cookie dough from the store I'd eat it before it made it's way to the oven. Yikes! It is a good thing I had a high metabolism in college...

After having a baby though, my view on baking changed. Now it wasn't just something I loved, it was something that was good for my family.

By by-passing boxed mixes or pre-made baked goods, I was able to simplify the ingredients list for the snacks and treats my family was eating.

Now, I'm not saying that I bake everything... we still have pop-tarts in our pantry and I haven't made homemade Cheese-It's yet. But I try to bake as much as I can. Some weeks I can do more than others. I'm not hard on myself when I can't bake our bread for the week. I know that store bought items are fine once in a while.

I think it is important not to put too much pressure on yourself when it comes to making the switch from store bought to homemade. Do what you can and know that even little switches are a big improvement!

I'm going to share a few of the things that I have gotten into the habit of baking on a consistent basis over the next couple of weeks. I hope that you find these things simple and beneficial!

This week: The one that started it all


One day at work, a co-worker brought in homemade honey wheat bread. She even brought butter and honey to have with it. The bread was still warm- I was amazed that she had time to bake this before work! Isn't baking bread supposed to be complicated? After discussing this with her, I realized it's not that hard, anyone can do it! No bread maker required.

Here's the recipe from Gold Medal Flour. It is super simple, doesn't take too long. And it makes 2 loaves!

My Mommy Machine Secret: after the first rise, when you divide the dough in two parts, place one half in a freezer bag that you have lightly sprayed with cooking spray and stick it in the freezer. When you are ready for loaf 2, take it out, let it thaw and rise and then bake as usual.

One loaf usually lasts us a week. I slice it thin because it is more dense than store bought stuff. It's great for sandwiches and with butter and honey.


This was the recipe that gave me faith that I could bake so much more than cookies. I saw the way it changed the health of our family {there is a more fiber in this than the store bought stuff, it makes a difference}.

I hope you enjoy it too!

Friday, June 14, 2013

My Organized Pantry

Last week I shared about my organized fridge.

For the same reasons I keep my fridge organized, I keep up with my pantry too. It saves time and money and keeps me from wasting food.

I use a combination of lazy-susan's and baskets to help me make sure my pantry doesn't get out of control.  I absolutely love my pantry- it was a selling feature of our house for sure! There are tall shelves and it is deep which means I can store small appliances that I use less frequently behind the food. It makes for a somewhat chaotic appearance (as you will see in the pics) but it completely makes sense once you see my "zones".

Even if your pantry isn't as big, no worries. I have always organized my "pantry items" this way- even when I was in an apartment with no pantry! My Mommy Machine Secret is to keep like items together so that when you are making a grocery list or cooking/baking you always know exactly where to look for something. And you know if it's not in the zone, then you are out- this keeps you from having to search high and low {hello, time saver}!

Here's how I like to organize my pantry:


Top Shelf:
Appliances
Recipe Box
Cook Books
I also keep my parchment paper and wooden skewers there too because they don't fit anywhere else!

Second Shelf:
Cooking spices are to the left on lazy-susans.
Baking ingredients are to the right. I use a basket to contain the items in bags- brown sugar, chocolate chips, etc. A lazy-susan keeps my spices, baking soda & powder, as well as cocoa organized.
I keep small appliances, like our Fry Daddy and food processor, in the back.

Third Shelf:
Pasta, rice, and canned goods are to the left. I use a lazy-susan for canned goods and a basket to corral all my pastas.
Snacks are to the right. I use the basket for opened bags and items that are the "last of their kind" meaning I threw the box out for trash day and they needed a home :-)
In the back, the blender has a home as well as surplus things like extra ketchup or chicken broth.

Forth Shelf:
Cereal, breakfast items, and bread are to the left.
Extra snacks, lunch boxes, to-go cups, and trash bags are to the right. I keep the lunch boxes in a large drink tub, this way the tub has a home and the lunch boxes don't fall all over the place.
Pitchers and unused containers, like my tall pasta canister, go in the back.

On the floor of our pantry the only things allowed to stay are our recycling bags and trash can. Occasionally we will have soda, but I try to keep it clear.

Having an efficient and organized pantry makes spending time in the kitchen much more enjoyable for me!

Do you have any secrets to keeping your pantry organized?

Wednesday, June 12, 2013

Cut the Junk: 1 Week of Meals

Remember the time you read a really awesome "Cut the Junk" series, got inspired, and then didn't know where to start? Yes? Me too.

I know what it's like to be completely overwhelmed while trying to make a lifestyle change. The first time I walked into the natural foods section of our local grocery store to buy gluten-free food for Speedy, I was so overwhelmed I wanted to give up... and I had barely even started. Giving up wasn't an option, and 2 years later I can talk anyone's ear off about gluten-free foods. 

Any lifestyle change is going to be tough. There's a learning curve, and mistakes will be made whether they are intentional or not. You'll want to give up some days because, let's face it, it's easier not to worry about how your food is grown, where it comes from, and how it's produced. Food is just too complicated these days; it's not simple like when my great-grandparents grew most of their own food on their little farm property in Iowa. 

Since I know how overwhelming all of this can be (and I'm still overwhelmed every time I take another "baby step"), I want to help you get off on the right foot. I've put together a one week "real food" meal plan which includes breakfast, lunch, dinner, and a snack prep list.


Well, folks, this marks the end of the "Cut the Junk" series. I hope you were inspired and encouraged throughout the last couple of months, and will start to make some positive changes towards real food! I'll still be writing about my own real food journey, sharing tips, and answering questions I've received from our awesome readers in future posts. If you ever have questions, you can leave them here, shout them out on Twitter, or ask on Facebook. There's no such thing as a stupid question, and chances are someone else is wondering about it as well. ;)

Need to catch up on the series? I've got ya covered...

Week 5: Snack Swap


Tuesday, June 11, 2013

Tip for Tuesday: Clean Microwave in 5 Minutes

Have you tried this trick to clean your microwave in 5 minutes with NO- zero, zilch- scrubbing?!?

This is one of my favorite cleaning tricks.


Here's what to do:
In a microwave safe dish, add one cup of water. Squeeze in the juice of one lemon.

Microwave for 3 minutes. DO NOT open the microwave door for another 2 minutes. The steam is working its magic.

After that 2 minute steam bath, open the microwave door and wipe every surface {don't forget the top} with a damp paper towel or microfiber cloth.

That's it! You will be amazed at how easily all that microwave junk comes off.

Monday, June 10, 2013

Clean & Lean: Laundry PliƩs

Raise your hand if you'd like your boo-tay to be a little perkier.

**Raises hand**

Recently, I was trying on swim suits. Not my favorite thing to do. Thanks to the tight elastic, awful lighting, and wicked mirror, it was pretty obvious that gravity is starting to affect my rear.  Since then, I make sure to incorporate some of these butt-lifting pliĆ©s into my laundry routine! An extra perk (get it?) is that I also feel like I'm in ballet class again. Memories...

Anyway, here's how I lift my gluteus maximus AND get the awful chore of folding laundry finished.

Proper Form

  • Stand in front of your {full} dryer. Half a foot to 12-inches away from the opening.
  • Put your heels together and point your toes in opposite directions:
  • As always, keep that tummy tight!
  • To do a pliĆ©, you keep your heels together while pushing your knees out and bottom down. Lower slowly and raise back up slowly. Imagine you are a graceful ballerina. :-)

Clean & Lean

  • As you pliĆ©, grab an item out of the dryer.
  • Do one more pliĆ© as you fold the item.
  • Repeat as necessary until your muscles burn or your dryer is empty!

Step It Up

Hold the pliƩ position (where your bottom is down) while you fold (or about 15 seconds) and then raise up.


Can you feel the perkiness? I can! Happy ballet-ing!

Don't forget to enter our super easy 31 organization giveaway here!!

Friday, June 7, 2013

My Organized Fridge

It's not easy to keep the refrigerator organized. We don't have a huge fridge, it's a normal size but it probably isn't as big as I would like to have for our family of 4. It gets the job done though!

Keeping the fridge & freezer organized is one way that I save money and make my monthly meal planning work.

If I can't see what we have or don't have I end up buying something we already have or not getting something I thought we had. Everything has its place so that I can glance quickly and see what I need to add or take off my grocery list.

Usually, the fridge is almost empty by the time I go to the store. Since I only shop 2 weeks at a time, most of the stuff in the fridge (with the exception of condiments and such) gets replenished when I go to the store.  I take advantage of the fridge being almost empty and clean any shelves or drawers that are empty before I go to the store :-)


To make meal planning, shopping, and cooking easier and more efficient I've divided my fridge and freezer into "zones". Here's how it looks:

The fridge:
  • Since dairy stuff like yogurt & tub butter is small, it sits next to the eggs on the top shelf.
  • I keep meet that I am thawing {and the bacon} in one of the small drawers.
  • In the other small drawer goes all of our cheeses- shredded, blocks, sticks, all the cheese!
  • The middle shelf is really a catch all. Left overs, snacks, tall drinks (including my iced coffee pitcher which was in the dishwasher when I took this picture), sometimes bread and such. Mommy Machine Secret: I keep this shelf with lots of height so that I can see anything that ends up shoved to the back.
  • The lower shelf is for soda and snacks for the kids. {Another MM Secret: I take the lids off of the snack tupperware in the morning and put it back on at night- this way the kids can grab a handful on their own during the day and I don't forget to cover the snacks up at night since the lid is right there}
  • I keep fruit and veggies in separate drawers. I also keep those single-serving fruit cups in the fruit drawer.


The fridge door:
This is the hardest section to keep organized! Things tend to get tossed in and I'm always having to reorganize. These are the "zones" that are the easiest for me to maintain...
  • Butter and cream cheese gets stored in the top left compartment.
  • We usually have 2 gallons of milk in the fridge at all times- we love milk! Sometimes one carton gets kicked out so that my iced coffee can reside in that space, otherwise the coffee goes on the middle shelf in the fridge. There is usually just enough room for my half and half and cream.
  • The middle shelves are just for sauce- yes, I only keep sauces in this space. Soy, strawberry, spaghetti, BBQ, steak,  pizza, taco- it has to be a sauce! {MM Secret: this helps when putting things back after cooking, you know, that crazy time when you just want your kitchen to be clean so you are stuffing things back in the fridge without thinking about where you got them}
  • The bottom shelf is everything else- condiments, dressings, jelly, syrup, etc.


The freezer:

  • Next to the ice, I keep all my sweet stuff! Easy access.
  • Bottom shelf is meat, chicken, breads. We do have a deep freeze that keeps all of our ground beef.

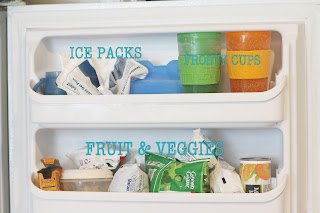
The freezer door:
  • Ice packs and frosty cups on the top.
  • Frozen fruits and veggies on the bottom shelf.
  • I also keep a box of baking soda in there :-)


I hope that some of these ideas help you too!

Do you have a good fridge/freezer organizing tip? Share it with us in the comments section. We'd love to hear it!

Wednesday, June 5, 2013

Meal Planning Week-by-Week

Meal planning. It seems like there are million and one ways to do it. I've tried to plan by month, by paycheck (2 weeks at at a time), and by flying by the seat of my pants. I don't recommend the latter.

I've found that I need to have a plan, but trying to plan too much at once puts my brain into overload. I plan for 3 meals: a weekly breakfast item, school lunches, and dinner. I do this every Thursday morning for the following week.


The first thing I do is dig out my big list of meal ideas, which keeps my planning time to a minimum. I don't have to think too much about what meals we've had in the past that we love, or which meals I haven't cooked in awhile. Do you see a pattern here? I don't want to put a lot of energy into this, so I make it as easy as possible.

Next, I look through my idea list and write each dinner (including "eating out" days) on my Erin Condren weekly schedule pad.  The weekly schedule goes right on the refrigerator, so everyone can see the week's events and no one asks me "What's for dinner?" every. single. night.  I also write it in my Erin Condren life planner so it's easily accessible if I head to the grocery store on a whim. I'm basically obsessed with all things Erin Condren. Is that obvious?


Then, I figure out what breakfast item I'm going to make for the week and write that in on Sunday. I'll usually make something like egg casserole bites, fruity oatmeal bake, or whole wheat muffins on Sunday for breakfast, and then freeze whatever is left. We always have a quick and healthy breakfast ready to go for us on busy weekday mornings.

Lastly, I plan Speedy's school lunch. I honestly just write it on a piece of notebook paper and tape it to the inside of a cupboard. Nothing fancy, but it gets the job done. I write out everything he should have in his lunchbox for each day, that way the hubs knows exactly what should go in the lunchbox if he ends up doing it some random morning. On a side note, he really appreciates this because he tends to get frustrated with packing lunches. :)

Sometimes I will make my grocery list right after I finish planning, but most of the time I make the list on Friday. Shopping happens on Saturday or Sunday- depending on our schedule for the weekend.


Do you have any meal planning tips? If so, we would love you to share them! 

*As a side note, this post is not sponsored at all by Erin Condren. I'm really just this obsessed with her stuff and I use it for everything! 

Tuesday, June 4, 2013

Tip for Tuesday: No-Flip Oven Fries

I've been making my own oven fries for a few years now, and it's only been recently (as in the last 6 months or so) that I've finally figured out how to bake them without them sticking to my pan or having to remember to flip them over.

Just set a cooling rack or other wire rack on top of your baking sheet. No need to flip and they won't stick. Life changer, I know.


Bonus: These fries are super simple. In a glass bowl, mix extra virgin olive oil, sea salt, and black pepper (sometimes I add parmesan cheese and other herbs- you can totally make them your own!). Cut each potato into 8 pieces- I usually do 1 potato per person. Throw the potatoes into the bowl, coat, stick 'em in the oven at 400 degrees for about 30 minutes. Done! 

Monday, June 3, 2013

Lean Arms Challenge

Clean & Lean has absolutely changed the way I think about "working out". It has been my motivation to keep trying and to make every movement count.

I have found that I am finding ways to keep fit while doing other things, too. Like a ripple effect, now that I have the mindset that I can make every activity work for my work out, even watching TV has me thinking about how I can be doing a few extra ab exercises.

My mom and I were chatting about summer approaching and what to do to get rid of that arm flab. You know, the top part of your arm that waves even when you aren't waving. I think one time I heard Oprah call them her flags.

Anyway, I explained to my mom that, back in the day when I would go to an exercise class a few times a week, my instructor showed us how to do a "Dr. Oz move". Now, I have tried and tried to find video with this arm move on the Dr. Oz show. I have been unsuccessful in digging it up so I can't say with certainty that it really came from his show. Either way, Dr. Oz is in no way related to or even remotely aware of this post ;)

As my mom and I discussed, the problem with this part of your arm is that the muscles that make up the back of your arm, your triceps, aren't easily worked. Most of our normal activities work our biceps, and that gives our triceps a little work, but not as much as they need to stay toned. Sometimes you've got to be really deliberate about working your triceps.

I told you that story to tell you this: my mom and I have started an arm work out "challenge". I have added 2 minutes to my "Clean& Lean" routine everyday and she is doing the same. Yes, everyday- 2 minutes to better toned triceps!

Here's Tricep Workout 1 (aka "the kind of Dr. Oz"):


  • Set a timer for one minute.
  • Hold both arms out in front of you with your elbows straight and the palms of your hands facing each other.
  • Tummy tight!
  • Quickly move your arms up and down while keeping your arms straight and your hands facing each other.
  • Kind of like a scissor move...


Tricep Workout 2:


  • Re-set the timer for one minute.
  • Hold your arms in front of you and bend your elbows so you make a square in front of you.
  • Keep your elbows up! They should make a 90 degree angle with the floor at all times!
  • Start with your left arm on top.
  • Quickly move your elbows out to the side and then back in front.
  • Switch your right arm to be on top after 10 seconds- keep switching every 10 seconds.
  • This move feels like you are trying to give someone a hug...


Here is my "before" picture:

Here I am after 2 weeks:

I will post an update in 2 weeks and in 4 weeks  :) Join me, won't you??

Remember that, it is better to do toning exercises in combination with cardio. You also want to be careful not to over extend or injure yourself! Focus on your form and your workout will go much farther.

Happy toning!!


Don't forget to enter our super simple 31 giveaway here!


LinkWithin

Related Posts Plugin for WordPress, Blogger...