Friday, August 30, 2013

August in Review


August has been a fun month! Lots of great tips and good recipes.


Here's a look at a few of our favorite posts from August:

A simple tip for perfect mashed potatoes. Creamy mp's are easier than you think!

When it comes to having mom friends, it can be hard to meet other moms when you move to a new place. Our mom friend, Lissette, introduced herself. Part 2 of this post is coming soon :)

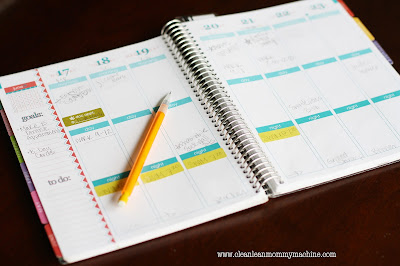
Erin Condren Week was so colorful and organized! Jess and I love practical things that make our lives easier. Keeping up with life is fun and functional with the EC products we love: the Oh!What a Week and Life Planners.

Jess shared a few recipes that double as "life savers". Don't want to throw out bananas that are too ripe? Hate buying applesauce that has high fructose corn syrup, or the expensive stuff that is without HFC? Are you searching for great gluten free products and a recipe you can make at home? Check out these posts from this month:
One way to use over-ripe bananas is this yummy recipe!

Flavor applesauce the real food way {and save money while you're at it}.

Jess' favorite gluten free products and a yummy gluten free recipe to make snack time extra yummy.


Wednesday, August 28, 2013

My Gluten-Free Favorite Finds + A Sweet Potato Snack

Although I try really hard to always feed my family real food, sometimes I need a little help from some pre-packaged convenience foods. This is mostly true when it comes to my son's gluten-free foods- I just don't have the time to make all of his favorite snacks, and because of his food sensitivities (texture, smell, etc.) and his need for things to always be familiar and the same, it's just better for all of us if I buy some of his foods pre-packaged.

Here are a few of my go-to gluten-free products:

Udi's Gluten-Free Whole Grain Bread: I love this stuff and use it for obvious things like sandwiches and toast. I also use it for french toast and as breadcrumbs for chicken and fish.

Applegate Gluten-Free Chicken Tenders: My favorite thing about these are that they're all-natural in addition to being gluten-free.

Bisquick Gluten-Free: This makes my life so much easier. Perfect for whipping up a batch of pancakes or biscuits in a pinch!

Applegate Natural Honey Ham: Oh my word- this stuff is so good! We use it on sandwiches and in egg scrambles.

Nabisco Gluten-Free Rice Thins: These are the perfect replacement for traditional wheat thins. We just love 'em with peanut butter, cheese, or plain! (these just rolled out, so I couldn't find a product page)

Of course, our absolute favorite gluten-free foods are fruits and veggies, because you just can't go wrong with them! Here's one of my little dude's favorite snacks- cinnamon sweet potato stars!


Cinnamon Sweet Potato Stars
recipe adapted from Family Fun Magazine

Ingredients
1 large sweet potato
2 tsp. extra virgin olive oil
1 tsp. ground cinnamon (add more to taste)

Directions
Preheat oven to 400 degrees.
Peel sweet potato and cut into 1/2 inch slices. You can estimate your thickness- that's what I did. Hopefully the measurement police don't find me, because I'm pretty sure I'm the world's worst when it comes to measuring things by just looking. But I digress...

Use a cookie cutter to punch out star shapes and then put the stars in a ziploc bag with olive oil. Shake the bag until all pieces are coated.

Put the stars on a cookie sheet and sprinkle cinnamon on top to taste. Bake for about 25 minutes, flipping them halfway through baking. Keep an eye on them- they are done when they're soft and lightly browned.

Once cooled, serve with a yummy yogurt dip! Just take 1/4 cup of plain greek yogurt, and add pure maple syrup to taste (start with 1 teaspoon). My kids loved this dip for the sweet potatoes as well as fruit. Enjoy!


*This is not a sponsored post

Tuesday, August 27, 2013

Tip for Tuesday: Hydrogren peroxide as a stain remover

Do you all use hydrogen peroxide? Did you know it's not just for disinfecting cuts and scrapes?

Through puppy training, potty training, scraped knees, tummy bugs and many things in between, hydrogen peroxide is my go to for messes like urine, poop, blood, and vomit. Yep.

Not only will it get the stain out, it will also deodorize- very important for the aforementioned messes.

Always try using hydrogen peroxide on a small unnoticeable piece of fabric or carpet to make sure it won't discolor. It is safe for a lot of things- but not everything.

I keep my hydrogen peroxide in a spray bottle. It makes it easy to use and I don't have to worry about pouring too much on the stain.

Simply spray hydrogen peroxide on a stain, let sit for a minute or two and blot with a paper towel. For stains in clothes you can soak the stain in hydrogen peroxide and then rinse out after a few minutes (remember to test the fabric first).

I have used this trick on our carpet, couch, towels, rugs, socks, shirts, and more. It works great!


Monday, August 26, 2013

My Must-Have Kitchen Items

This post is not sponsored. Links are provided to sources but the makers of these products don't know who we are or have any idea we are writing about these things.

Cooking and baking are a couple of my favorite things. Over the years I have become a kitchen "stuff" junkie- I love utensils, pots, pans, and gadgets that make cooking and baking easier!

I will confess that not all kitchen items are as necessary as I think they could be. I have sold more than a couple in garage sales because I just didn't use them.

Today I'm going to share my top 5 kitchen items that I use all the time! I've linked all of them to their source, too.


Wooden spoons are great for some things, but when it comes to browning ground beef or ground turkey, this is my go-to utensil. The Pampered Chef Mix'n'Chop allows you to stir and crumble the ground beef while it's browning. If you like your ground meats to be crumbled in smaller pieces, this is a must have.

The Rosle silicone flat whisk makes my gravies and sauces so much smoother. It is also perfect for de-glazing a pan.  I used to think that a regular wire whisk was fine for these things but I was wrong! It makes a big difference when you use the right tool.

This Pampered Chef Mix'n'Scraper is one utensil I use everyday. It works for everything from cooking to baking, scraping to stiring. It's just so versatile and handy. With it being silicone you can use it on any surface and it withstands really high heat. I pretty much love it.

Stoneware is a life changer when it comes to baking. Cookies really are better on this Pampered Chef stoneware bar pan. As you can see, I use it for cookies- a lot. The stoneware heats more evenly so you get a fluffier cookie. It's great for other things too, anything you want to bake will be better in a stoneware pan for sure!

Ah, my cast iron skillet. This pan is so wonderful. Mine is a Lodge 12" seasoned cast iron skillet. The majority of our dinners are made, in part, in this pan. There is definitely a difference in flavor, everything tastes better when cooked in cast iron.  The only things that don't get cooked in here are meals that contain citrus, tomato sauce, or seafood. Other than that, this is my dinner pan!

What's your must-have kitchen item? I'd love to hear it!

Friday, August 23, 2013

Friday Favorite: Little Green Pouch + Naturally Flavored Applesauce


*This is not a sponsored post.

My kids love squeezable applesauce. I mean LOVE it. My son can go through an entire box of 4 within a 20 minute time frame- no joke! My husband wasn't thrilled about this because that meant I had to go by more and buying 6 boxes a week adds up. So, he came up with his own idea to suck up applesauce through a syringe we had laying around for Speedy's meds, and insert it back into the applesauce squeezers... that way we're re-using them, right?

I wasn't as excited about this idea for a few reasons. For one thing, I don't want to spend 20 minutes filling up a squeezer with applesauce via a syringe. Or small funnel. Or anything that is going to require too much of my time. Secondly, let's just talk about the bacteria and germs that form inside those packages. Eww. Obviously, A made sure to wash them out, but because of their design, you really can't wash them out completely.

After a week or so of this crazy technique, I found Little Green Pouch.  Re-useable, dishwasher safe, and super easy to fill... it was the perfect solution to this applesauce obsession phase! We also filled them with yogurt, pudding, and flavored applesauce.

Want to know another Mommy Machine Secret? I buy organic, unsweetened applesauce and flavor it myself! It's easy, you're adding a little nutrition, and there's no extra junk involved. Win-Win-Win.


Here's how I do it:

Combine 1 cup of sliced fruit with 1/4 cup of water and 2 tablespoons of pure maple syrup in a saucepan. Bring to a simmer by cooking over medium-low to medium heat for 8-10 minutes, or until your fruit is soft. Let cool for a few minutes and then blend! I use an immersion blender, but you could use a regular blender.

Add your fruit sauce to the applesauce, a small amount at a time, until it fits your taste. There's lots of room for sampling with this recipe. :)

The combinations are endless and I really think a few veggies could work their way into one of our flavors someday soon!

If you have some Little Green Pouches, add the flavored applesauce to your pouches and keep stored in the refrigerator for the upcoming week of school lunches or snacks. Otherwise, you can store the applesauce in it's original container or in another airtight container.

What flavor do you want to try?

Wednesday, August 21, 2013

10 Ways to use over-ripe bananas + A Yummy Muffin Recipe


We eat a lot of bananas in our house. All four of us love them, but most of the time we just don't eat them fast enough and I'm left with a bunch of over ripe bananas on the kitchen counter. I don't like to throw out food, and brown-spotted bananas are no exception!

Here are a few ways to use up those bananas when they've gotten past their prime:

1. Banana Bread
2. Chocolate covered bananas
3. Banana Sauce (super yummy over fresh fruit!)
4. Whole Wheat Banana Pancakes
5. Banana Ice Cream (recipe)
6. Freeze to use in smoothies
7. Banana Oatmeal Muffins (my kids love this recipe!)
8. Frozen Peanut Butter Banana Sammies
9. Bake Chocolate Coconut Cookies (recipe)
10. Cinnamon Grilled Bananas (recipe)


One of my favorite recipes that includes bananas are my chocolate chip banana muffins.


They are perfect for breakfast, a snack on-the-go, or as a sweet treat in your kids lunch box.


These definitely fall in the "20%" category of our 80/20 real food rule, but like I've said in the past- it's ok to treat yourself sometimes! :)


Banana Chocolate Chip Muffins
adapted from original recipe by Baked Perfection

Ingredients
1 C. unbleached all-purpose flour
1/2 C. whole-wheat flour
1 tsp. aluminum-free baking powder (this is easy to find at your local grocer!)
1 tsp. baking soda
1/2 tsp. sea salt
1/2 tsp. cinnamon
3 ripe bananas, mashed
1/4 c. white sugar
1/2 c. brown sugar
1 tsp. pure vanilla extract
1 egg
1/4 cup butter, melted
1 1/2 C. dark chocolate chips
1 tbsp. whole-wheat flour
1 tbsp. turbinado sugar 

Directions

Preheat oven to 375 degrees. Grease or line muffin cups. 

In a large bowl (I use my KitchenAid), mix together all-purpose flour and whole-wheat flour until well combined. Add in baking soda, baking powder, salt, and cinnamon. In another bowl, beat together bananas, sugars, vanilla, egg, and melted butter. Stir the banana mixture into the flour mixture until combined. Be careful not to over-mix. 

In a small bowl, mix together chocolate chips and 1 tbsp. flour- this keeps the chocolate chips well dispersed in your muffin. Stir the chocolate chips into the batter. 

Fill muffin cups evenly and sprinkle the tops of each muffin with turbinado sugar. If you don't have turbinado sugar (I rarely do), you can just use granulated sugar or no sugar at all. 

Bake for 15-18 minutes or until a toothpick inserted in the center comes out clean. For mini muffins (great for school lunch or a quick sweet treat), start checking at 8 minutes. 


Tuesday, August 20, 2013

Tip for Tuesday: "Cleaner" Shopping Cart

This tip might be a no-brainer, but it took me a while before I had an "ah ha!" moment.

Most stores have "cart wipes" in the front of the store, but they are located behind the carts. So, most people grab a cart and then wipe it down. Doesn't make much sense, does it? You've already made contact with any icky germs hangin' out on your cart handle. 


My mommy machine secret: Walk past the carts, grab a wipe, then wipe your cart handle down before you touch it. 

Am I the only one who has made this mistake? 

If so, I feel like a complete idiot for sharing this discovery. 

If not, I'm happy I saved you from that toddler's booger on the underside of your cart handle. 

Monday, August 19, 2013

My Top 5 Uses for White Vinegar


I have been out of town on a nice, relaxing, fun girls weekend! It's so great to get away for a day or so and relax, but it is always so wonderful to come home.

Yesterday, when I got back in town, I started laundry, prepped snacks for the week, and made dinner.

All three of those tasks had something in common {other than the fact that you could call them "chores"}: I used white vinegar for all 3! Talk about versatile.

Now, I am aware that there are numerous ways to use vinegar. And I know that it's all over Pinterest. I am going to highlight the top 5 ways that I love to use this stuff. {Note: I did not come up with these ideas on my own, I have provided links to the sources I reference in my daily life but please note, they might not be the inventors of the method being shown}


Top 5 Uses for White Vinegar

1. Laundry Booster/Fabric Softener: We have skin sensitivity issues in my house. To keep the eczema to a minimum, I don't use scents or dyes anywhere near our laundry.  Adding white vinegar to the "fabric softener" cup in my front load washer keeps colors from bleeding {read: I don't have to sort laundry}, our laundry stays soft, and it helps to keep my towels extra clean without having to use bleach. As a bonus, it also helps keep the mildew in the washer drum to a minimum!

{Check out this website for the source for tips one and two.}

2. Produce Wash: A couple of tablespoons of vinegar and some cold water make the perfect fruit and veggie wash! Just add the vinegar to a big bowl, add water, add fruit and let it soak for 5 minutes before draining and rinsing. This helps to get produce cleaner than water alone and you won't taste the vinegar- promise. I do this every 2 weeks when I get back from the grocery store.

3. Cooking: duh, right? There are lots and lots and lots of recipes including vinegar. It adds a nice bite to dressings and sauces among other things. Here's the link to PW's website {she doesn't know me nor does she have any knowledge about this post} where she shows how to make a BBQ sauce to put over meatballs. I don't make my meatballs the same way, but I follow the BBQ sauce recipe exactly. It's so yummy and uses- you guessed it- vinegar!

4. Cleaning: basically, vinegar=clean. When combined with other common household ingredients (and even on its own, sometimes) it's a great degreaser, deodorizer, soap scum remover, and mildew preventer. Pinterest is crawling with tons of great recipes for homemade cleaning products that use vinegar! Just search "vinegar cleaning" and you'll be good to go. My favorite recipe is also my last favorite...

5. Drain Deodorizer: I have given you all a tip to clean your garbage disposal, but what about the other drains in your house? I use equal parts vinegar and baking soda in any drain that starts to smell, or when I am doing my seasonal cleaning (every 3 months). The vinegar plus baking soda will clean and deodorize and all you have to do is wait.

Vinegar is essential in our house. I always have a huge jug on hand.

How do you use vinegar? Tell us and we may feature your favorite use in a post!

Friday, August 16, 2013

Friday Favorite: Adaptable Teacher's Planner

In keeping with our Erin Condren "theme" this week, I wanted to show you all what my mom has done with her Erin Condren Teacher Planner. My mom works as a Curriculum Resource Instructor, she teaches kids but doesn't have her own classroom so her schedule is a bit untraditional (when you think about it, a lot of school staff have this same situation).

When it comes time to find a school-year planner she usually has to settle for making her own using a printable of some sort or making a lot of changes and "substitutions" to a traditional planner. She has had little luck in the past finding something that accommodates her scheduling needs and matches her fun and colorful personality.

Recently, a bunch of teacher's at her school bought their own Erin Condren Teacher Planner. My mom saw it and fell in love with the colorful design and awesome layout, so she bought one too. All of the sections were useable to her- she did have to change some of the headings to better meet her needs, but this required much less customization than previous planners she has used.

I think it is so great to take something you love and enhance it to better fit your life! Anytime you can find something that works for you and makes you feel happy just to look at it, you will probably use it more often! Don't you think?

Here's an overview of how my mom uses her EC Teacher Planner:


Colorful and functional. Gotta love that! The tabs make is easy to flip to the section you want. My mom also added the pen holder option so a writing utensil is always handy! Unlike me, she doesn't mind if her days are planned in ink. ;-)

In this picture below, you can see how she used labels and fun font to change the Classroom Volunteers section to be Important Numbers. Even with cell phones, you never know when you will need to remember someone's extension!

The absentee log wasn't necessary for my mom, but look how easy it transforms into a project tracker/to do list! With my mom's job, there are always ongoing projects so this section comes in handy.

The two page monthly spread is awesome! My mom decorated with some Suzie Zoo stickers :-) Check out how much room there is to write in those spaces.

 Here's the weekly planner. No changes needed here! All of that space is great for keeping up with meetings, special events, to do lists, etc. The columns at the top let you section your days into categories like "before school", "morning", "lunch", "plan", "after school" etc.
 This section is followed by a student checklist to keep track of kiddo's assignments, my mom works with students so that section was perfect as is.

The clear page protectors and pencil pocket make finding pens and the school's calendar easy peasy.

We both agree that the quotes are great! My mom has already decided that each month she is going to use the quote from the planner in her email signature. A great way to spread the joy.

We hope you've enjoyed EC week! As you've heard us say before, these posts are in no way sponsored. Everything is all us, and my mom!

Are you obsessed with Erin Condren? Tell us what your favorite product is and how you use it! Obsessed with another organizational/planner product- tell us so we can check it out too!

Wednesday, August 14, 2013

Keep your Week Organized: Oh! What a Week!

I think most of you know the love I have for all things Erin Condren. I can't live without my Life Planner, am smitten over her sticker labels, and my family wouldn't survive without her weekly schedule pad.

Like, I'm not even kidding. If I pulled out a hair for every time I was asked "What's for dinner tonight?", "When is the utility bill due?", or "What's going on this week?"... I'd be bald. And have more time on my hands because I wouldn't have to deal with my hair. I'd rather have less time and more hair. Anyway...

A couple months ago I bit the bullet and ordered my "Oh What a Week! Weekly Schedule Pad", which I had been eyeing for a looooong time. Little did I know what  life changer it would become- I literally use this for everything.


Weekly Meal Planning- No one has to ask "What's for dinner?"... unless they are two little 4 year olds who can't read. :)

Cleaning Schedule- Every day I have at least one cleaning task to accomplish... but normally it's more like 5. Keeping it on our weekly schedule helps Adam know what needs to be done and how he can help.

Bill Due Dates- This keeps us on track with bill due dates, even though most of our bills are on automatic payments. It's nice to see what's coming up, and I like to double check that our automatic payments go through.

Appointments- We have a lot of appointments between all of us, so it's great to see it in a weekly view. Plus, if something comes up and Adam needs to squeeze in plans or switch something around with the kids schedules, he doesn't have to come to me. Sweet freedom! :)

Holidays/Birthdays/Events/Playdates- It's nice to keep all of these things in our weekly schedule too. We never forget a birthday, and these are always things the whole family looks forward to (birthday parties, trips to the zoo, park playdates with friends, etc.).

Wanna know a secret? I re-use these. Oh yes, it's true. After the week is through, I'll either give it to the kids so they can paint/draw/cut or I fold it in half-2 times- and write my grocery list on it. Fits in my purse perfectly!

Another one of my Mommy Machine Secrets is that I use left over stickers from my Life Planner and use them on my weekly schedule pad. It helps the important things stick out.

Have I convinced you that you absolutely need this in your life? Good. That's what I thought. ;)

**By the way, Erin Condren has no idea who I am or anything about this little blog... so this is not a sponsored post. I just really, really, really love her products. 


Tuesday, August 13, 2013

Tip for Tuesday: A Bobby Pin Trick

Bobby pins aren't just for holding back flyaways anymore. One of my favorite things to use them for is to keep random papers securely placed until I can put them in their appropriate place.

You know there are always things that are floating around your purse or countertop. Some of those things are more important, like the RSVP card to my cousin's wedding...
See how I have used a bobby pin to hold it to my "Oh! What A Week Planner"? This way I won't loose it in the other mail clutter and it will get sent back in time.

This paint chip would be floating around my purse if I didn't have it bobby pinned to my life planner book mark. I'd probably forget I had it and end up getting another paint chip. Bobby pins to the rescue!

This is just one more quick fix to help control the clutter that so easily accumulates.

Monday, August 12, 2013

How I Stay Organized: My Life Planner

Welcome to Erin Condren Week here at CLMM! Jess and I are slightly obsessed with EC's fun, colorful designs and ingenious planning/life organization products. Nothing about this week is sponsored, it is completely our own opinions and nothing you see was given to us. We just really love this stuff and want to take a whole week to share the wonderfulness with you all!

About a year ago, Jess and I were talking and she was describing to me her Life Planner. I was all "wow that sounds awesome" and she was all "yes, it's fantastic, you have to have one."

I took her advice and in September 2012 I began using my Life Planner to, well, plan my life. It keeps my days organized and helps to keep me on task!

You can check out all the product features here. Today I am just going to share with you all how I use my Life Planner!

First of all, I have one "rule" for my life planner- no ink shall touch it's pages. That's right, I go old school here and ONLY use pencil. Apparently, as much as I try to plan my life there are always things that change and I can't stand having to cross out and write in. :-)
 One of the features I use on a regular basis are the stickers that come with the Life Planner. There are some that are pre-made (dr. apt, mani/pedi, etc.) and then there are blank ones. I love the stickers because they make important things stand out. Sometimes you need things to jump off the page and get your attention, like swim lessons, or that dentist appointment you made 6 months ago that is suddenly only days away. 
 The things I write in my planner:
Blog posts- I write in my ideas for the week and then I put a big "S" over them when they are scheduled, I also write in Jess' posts when she schedules them. This helps me with social media because I can see what I need to Tweet about for the week.
Weird work hours- I use Outlook to keep me organized at work so I don't include work appointments in my planner, however, if my work hours change I write it in to remind me and so I won't forget to tell our sitters.
Appointments and Events- obviously, I keep track of the whole family's appointments as well as special things we have to do, like birthday parties, swim lessons, play dates, etc.
Meal Plan- you can see here how I use my planner to do my monthly meal plan, every week I write in the meals we are having at the bottom of each day.
Goals- any projects I want to finish that week or important things I need to get done go in this handy little side section.
To Do- There is a weekly "to do" list space, but I usually write in what I need to accomplish each day in the actual day, not the "to do list". In the pic above, I have written in on Wednesday that I need to photograph and write a blog post. Sometimes I will make a to do list of errands I need to run or people I need to call. I love lists... 
I love the perpetual calendar in the front of the planner. This is another tool that I use weekly. I always check to see if I have a birthday or anniversary coming up. I can also see how many cards I am going to need each month and then I can add those to my grocery store list. 
Are you a quote person? I am! I love the quotes throughout the planner- just a nice extra :-) Another "extra" feature I love are the notes pages in the back of the planner. I use them for things like planning parties or weekend getaways so that all my notes stay in one place.
When you get something in the mail that looks like this, you know it's going to be good. I have just ordered my new Life Planner and I am so excited about the extra features this edition will have. I love anything that helps to keep my life on track, this life planner delivers!

The EC team sums it up nicely, "Enjoy!"

Friday, August 9, 2013

Party Pinatas: Sugarless Stuffers

My Little Man just turned 5. Don't even get me started on how crazy that is.
He wanted a dinosaur party which was easy enough. I don't do "Pinterest party's", it stresses me out too much to try to pull off cute decor and themed activities as well as all the food... I digress. I took Little Man to the party supply store and we picked out plates, napkins and a Pinata. Done.

I love pinata's. I think they are so fun and it cracks me up to watch the kiddos try to break it open. One thing that I don't do, however, is stuff it with only candy. I like a 20/80, candy to trinkets ratio.
Here's why:
1. Partys are all about the sweet stuff- cake and ice cream! I don't want too much candy to cause sugar overload.
2. This replaces the traditional goodie bag. Anything you would put in a goodie bag will more than likely fit into the pinata!
3. You only have to stuff one thing, not lots of little bags :-)
For Little Man's party, I found these little dinosaurs at the dollar store. Add in some suckers and, boom, you've got a par-tay.
Anything will work and you can stick with the theme of your party, here are some ideas:
Little animals
Bouncy Balls
Little bubble containers (like the wedding favors)
Crayons
Beaded necklaces
Gold coins (think: pirate treasure)

Look in the party favor section, usually anything that you can stuff into a goodie bag will do. Rawr!

Wednesday, August 7, 2013

Hi, my name is “Mommy”, “Babe”, “Sette”, “Squirt”, “Sis”…

This is Lissette and I last fall. She is an amazing person and I am beyond blessed to call her a friend. I've asked her to share her experience with starting up a MOMS Club. Adult interaction and mommy friends are sanity savers- big time! So, without further ado, here's Sette!

…also known as, Lissette, stay-at-home-mom, wife, friend, daughter, sister.  Some of the many names and hats I wear in my life, and I answer to all of the names above for the various titles given.  I am a 29 year old woman who holds a degree in Psychology and Sociology with a background in Social Work.  I also have a degree in butt-wiping, puke cleaning, baby bathing, cooking, “boo-boo” kissing, and hugs and kisses distributor.  I feel I am currently more defined by the latter.

                I try to be active in the community, but sometimes feel I overwhelm myself with what I want to do and what can actually be done.  I have two children who are 2 years old and almost 7 months old.  Both boys.  They keep me busy enough throughout the day I cannot remember what I was about to do, let alone what I need to do that day or week.  Funny how children make things a bit more interesting at all times.  I currently volunteer with March of Dimes in organizing their annual March for Babies event in our local area and fundraise for our family team as well.  In addition to this, I founded a MOMS Club chapter in our town and it is growing quickly. 

Growing up I always thought I would have a job where I go into an office, or the like, and work my whole life at something I only half enjoyed.  Never in my imagination did I think I would be able to stay home with my children at such a young age for myself and them.  Thanks to my husband, I have been a SAHM since my oldest son was born, and although it has challenges I would not want it any different.  I have not ever worked in an office while raising children, but I feel this “job” as their mother is the most difficult one I have held.  The most difficult, for me, is trying to stay connected to adults and other mothers like myself as being an at-home mother can be isolating.  There is only so much conversation you can have with a toddler.  When we moved to our town my oldest son was only 4 months old.  I had lived here before when attending college, but let’s face it, living somewhere as an undergrad is completely different than living in that same place as a mother!  Completely.  Different.  I did not know a soul and it’s a town where the main focus is on the college and not much in the community.  I searched and searched for a “mom group” where I could get connected and make some new friends.  I found a MOPS group which was already formed, but they were not meeting until September and it was May.  I had to wait out the entire summer to make any friends.  It sucked.  So, September came and I attended the meeting.  Only to find this group met twice a month and they were thinking of going to only once a month.  I don’t know about you, but how are you supposed to get to know people you only see once a month!?!  A month later, the group disbanded.  I came up short in the “friends making” department.

In the previous city we lived in I heard about MOMS Club at my son’s pediatrician’s office.  I thought it would be so neat to join and get to know other SAHM’s, but did not get a chance to as we moved shortly after this.  After the MOPS group was over I was at a loss.  We’re looking at about November after we had moved in May.  After I waited the whole summer to finally meet some other moms!  Coincidentally, I ran into an old college friend while grocery shopping who introduced me to a group of women who met once a week for a Bible study.  I was kind of desperate, so I joined.  All the while, in the back of my head I could not get over how much our community needed a “mom group”.  It desperately needed a group where the women had one thing in common, being a mom.  To me, it did not matter about anything else, such as, religion, politics, etc.  I needed mommy bonding.  Apparently, I was not the only one.  I talked to some other women I had met and pitched the idea to see if there was any interest in such a group before I got in over my head.  It seemed every mother I talked to was ecstatic about it, and my energy soon followed with the same excitement.  After several months of deliberating, I decided to go for it.  In March 2012, I registered our local chapter with the International organization MOMS Club.  On March 27, 2012, we officially became MOMS Club of Stillwater, OK and we had 1 member, myself.  Starting from scratch with so many ideas and having no idea what to do with them.  My oldest son was 14 months old.  Two days later, I found out I was pregnant.  Crap. 


Stay tuned for more from Lissette when "Part 2" hits the blog soon!

Tuesday, August 6, 2013

Tip for Tuesday: Perfect Mashed Potatoes

Have you ever had mashed potatoes that were watery, not creamy? That's a bummer.

Here's a little tip to make sure your mashed potatoes are never watery again!


After you boil and drain your potatoes, before you mash them, put them back in the hot pan (same pan you used to boil them, minus the water). Let them sit for at least 5 minutes before adding your butter and milk and mashing. Usually, you don't have to turn the heat back on, but if you want to make sure the pan is hot enough, turn the heat on low.
Can you see the steam? That's all the excess water in the potatoes evaporating which means it won't water down your mashed potatoes!

Monday, August 5, 2013

THE BEST Meatloaf Sauce

KC and I have a great family. We often get together for family meals with our moms and close relatives. Both of us have dishes we love to make at home because our moms made them for us growing up. My mom and my mother-in-law are great cooks! I have many recipes in my recipe box that are from them and I love that I can cook for my kids the way our moms cooked for us.

One recipe that I had to call my mother-in-law for was her meatloaf. KC loves it and wants it to be made exactly the way his mom makes it. This is completely fine with me! I've never been much of a meatloaf fan, but the sauce that my mom-in-law puts on her meatloaf is what makes this recipe so delicious. We have meatloaf and mashed potatoes at least once a month!


You can use this on top of any meatloaf variety. The sauce is so easy to make but makes a world of difference in the flavor of the meatloaf.


Ingredients
1.5 T Yellow Mustard
1 T Brown Sugar
1/4 c. Ketchup

Directions
While the meatloaf is on the oven, mix together ingredients until all of the brown sugar has dissolved into the sauce.
15 minutes before the meatloaf is finished cooking, take it out of the oven, cover with sauce, and return to the oven for the remaining cooking time.

See? So simple but so good!

You might notice that my meatloaf in the top picture isn't in a loaf pan. This is my mommy machine secret to faster cooking time! I also like doing it this way because there is a crust on the outside and the meatloaf isn't as soggy.

Another variation on my standard meatloaf recipe is adding sliced onions and green bell peppers to the top of the meatloaf (under the sauce in the top picture). This just adds a different texture, and it's easy to pick off but leaves a great flavor for the picky eaters in the family.

What's for dinner at your house tonight?

Friday, August 2, 2013

Get Ready for Going Back to School

Summer is such a relaxing time. Well, for my kids anyway. They get to go to the babysitter's house in their PJ's while I go to work. Must be nice ;-)

Anyway, August means "back to school". Yikes! How did that sneak up on me?! All of a sudden I start thinking about what a shock it is going to be when I have to get the kids up and at'em and dressed and ready... oy.

In an effort to make this a little easier, I have created morning and bed time "routine check lists" for my 5-year-old (he's only 5 years and 1 day old... my baby boy... **sigh**).  Since he is going to be in "big kid school" I know that our mornings will be our most important times- they will set the tone for the rest of the day. You can't have a good morning if you don't have a good bed time. Thus, the routine.

I sat down with Little Man and showed him what I was making- I talked it up "this is your big boy check list!" I included pictures with very simple words. I kept it to just 3 steps. Very simple! He loves being a big boy and getting ready on his own. I make a point to tell him how great he is doing and when I notice he has done something (like get dressed) I acknowledge what he's done and ask him what's next. He has to go check his check list, I don't prompt him. This is part of the experience!

Here are our check lists. You can make your own and customize them, or just use these. If your kids are older you may want to make them a little more in depth :-)

CLMM Morning Routine


CLMM Bed Time Routine


How do you get in the back to school routine? I'd love to hear your suggestions!

LinkWithin

Related Posts Plugin for WordPress, Blogger...